

Backups and restore
A backup is a complete, self-contained copy of a virtual machine that can be restored onto any node. This guide sets up a scheduled backup job, then restores from it.
Before you begin
Section titled “Before you begin”- Decide where backups will be written. Any storage with Backup in its content types can be a target, including a dedicated VM2Cloud Backup Server if you run one.
- Decide how many copies to keep. Retention is set per job.
- Backups are read-heavy on the source storage. Schedule them outside your busiest hours.
1. Check the backup storage
Section titled “1. Check the backup storage”- Open Datacenter → Storage.
- Select the storage you intend to use and click Edit.
- Confirm Backup appears in Content. If it does not, add it and click OK.
2. Create a scheduled backup job
Section titled “2. Create a scheduled backup job”Backup jobs are configured for the whole datacenter, not per node.
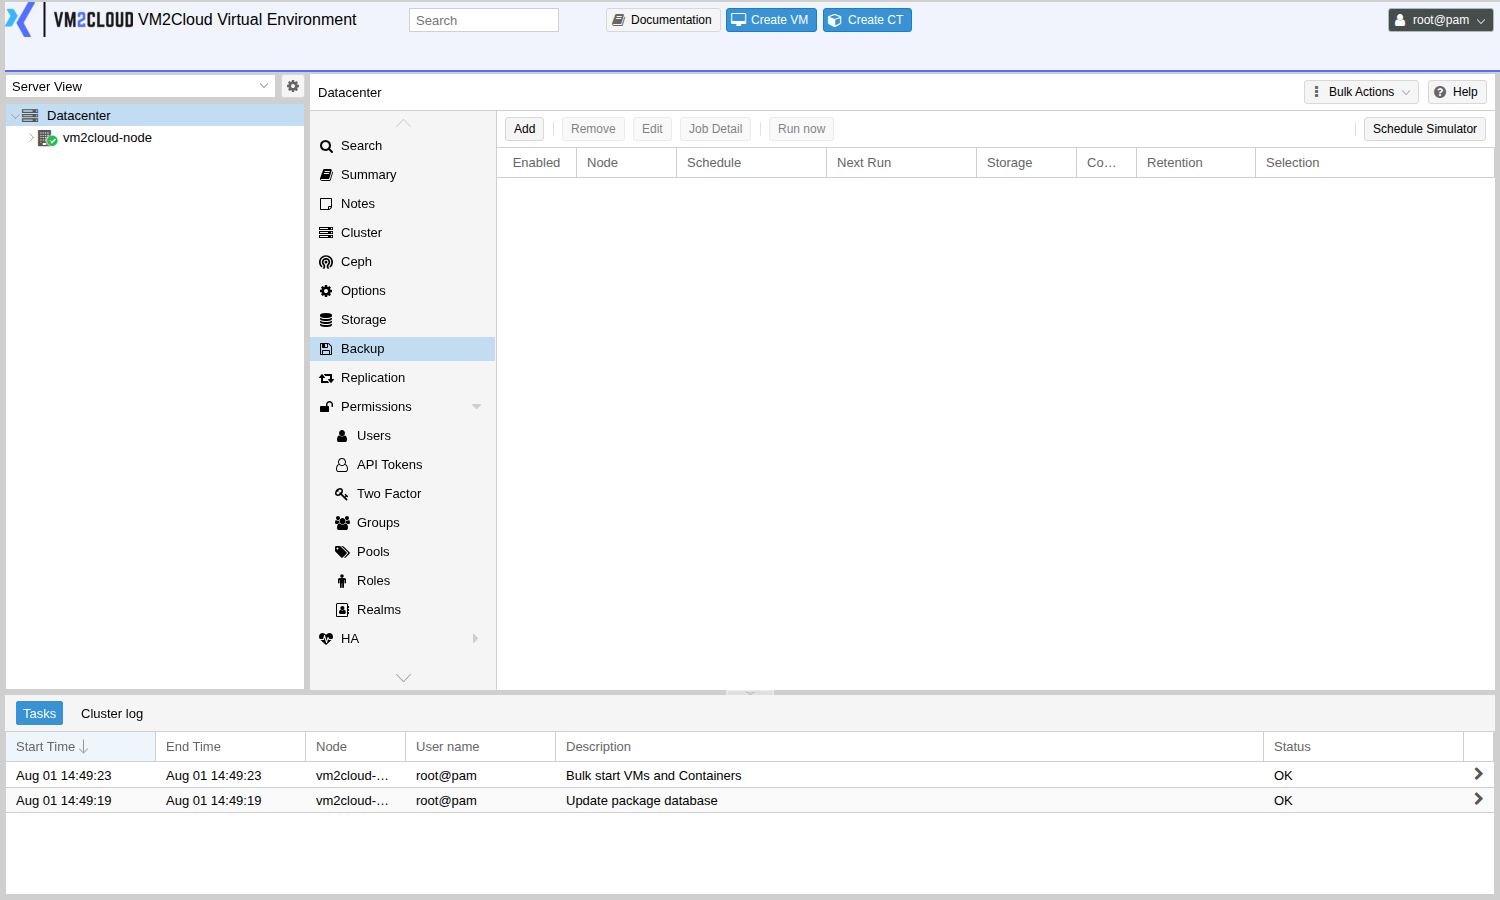
- Open Datacenter → Backup.
- Click Add.
- Set Storage to your backup target.
- Set Schedule to when the job should run — for example
02:00for every night, orsat 02:00for Saturdays only. - Under Selection mode, choose which guests are included:
- Include selected VMs — tick the machines you want.
- All — every guest on the cluster, including ones created later.
- Exclude selected VMs — everything except the ones you tick.
- Pool based — every guest in a resource pool; adding a guest to the pool adds it to the job.
- Set Mode — see the table below.
- Open the Retention tab and set how many copies to keep.
- Click Create.
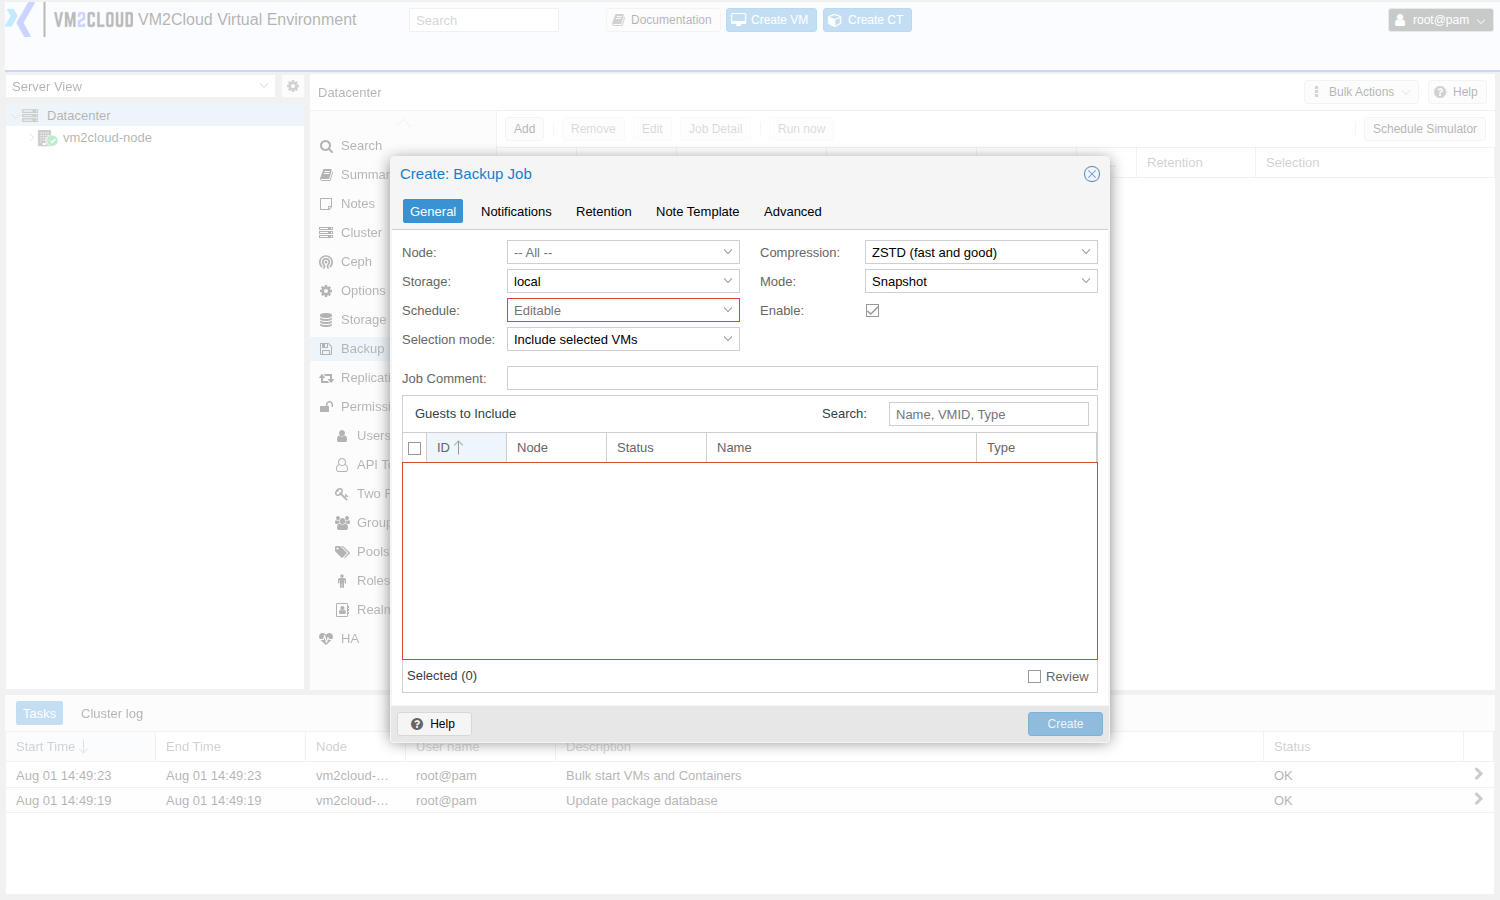
The job appears in the list and runs at the scheduled time. Select it and click Run now to test it immediately rather than waiting.
Backup modes
Section titled “Backup modes”| Mode | What happens | When to use it |
|---|---|---|
| Snapshot | The machine keeps running. The disk is captured at a point in time. | The default. Use it unless you have a specific reason not to. |
| Suspend | The machine is paused for the copy, then resumed. | Rarely needed; snapshot mode is usually better. |
| Stop | The machine is shut down, copied, then started again. | When you need a guaranteed-consistent copy and can accept downtime. |
3. Confirm the backup ran
Section titled “3. Confirm the backup ran”- Open Datacenter → Backup and select the job, or look at the Tasks list at the bottom of the screen.
- A successful run finishes with
TASK OK. - Open your backup storage in the Server View, then Backups, and confirm the archive is listed with the expected date and size.
4. Restore a virtual machine
Section titled “4. Restore a virtual machine”To restore alongside the original, as a new machine:
- In the Server View, select the storage holding the backups.
- Click Backups.
- Select the archive you want and click Restore.
- Set Storage to where the restored disks should be written.
- Set VM ID to a free ID, so both machines can exist at once. This dialog does not accept an ID that is already in use.
- Click Restore.
To restore over the original machine:
- Shut down the machine. A running machine cannot be restored over; the restore task fails and leaves it as it was.
- In the Server View, select the machine itself and open Backup.
- Select the archive you want and click Restore.
- Set Storage to where the restored disks should be written. The VM ID is fixed to this machine.
- Click Restore and confirm the warning that the machine’s current data will be erased.
Watch the task window until it reports TASK OK, then start the restored machine and confirm
its data.
Snapshots — a quick checkpoint
Section titled “Snapshots — a quick checkpoint”Use a snapshot before an upgrade or a configuration change you might want to undo.
- Select the virtual machine.
- Click Snapshots, then Take Snapshot.
- Give it a name and, optionally, a description.
- Tick Include RAM if you want the machine’s running state captured as well as its disk.
- Click Take Snapshot.
To go back, select the snapshot and click Rollback. To free the space again, select it and click Remove.
If something goes wrong
Section titled “If something goes wrong”| What you see | What to do |
|---|---|
| The storage is not offered as a backup target | Open Datacenter → Storage, edit the storage, and add Backup to its Content. |
| The job does not run at the scheduled time | Re-check the Schedule field, and confirm the node’s clock is correct — see Fixing “Authentication failed! (401)”. |
| The backup fails part-way with no space left | Check free space on the backup target, and lower Retention so older archives are pruned. |
| Restoring over a machine fails because it is running | Shut the machine down, then restore again. |
| The restored machine will not start | Confirm you restored to storage the node can reach, and check the Tasks list for the restore result. |
| The restored machine has no network | The restored configuration keeps its original bridge and VLAN. Check them under Hardware against the node you restored onto. |
Still stuck? Contact VM2Cloud support.